making macarons (#3).
1 Jul 2012 § 4 Comments
In spite of failing to make proper macarons in my previous attempt, I decided to try again after reading Eat. Live. Travel. Write.’s blogpost. Her recipe is adapted from BraveTart, but she ages her egg whites as well as rests the macaron batter prior to baking.
To cut a long story short, I finally found success with this and I’m going to document the process here – hopefully it will help anyone who stumbles across this post while researching how to make macarons.
The recipe is adapted from Eat. Live. Travel. Write., the method is based on how I made it.
Chocolate Macaron Recipe (French)
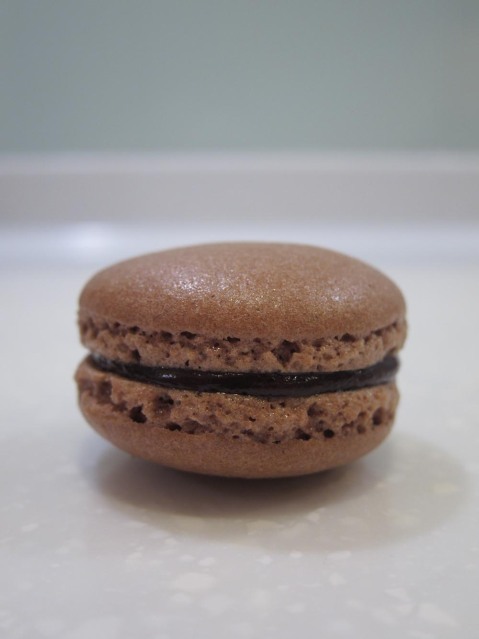
Ingredients (makes about 40 macarons if none of the shells were to crack):
- 115g ground almonds
- 230g icing sugar
- 15g cocoa powder for chocolate macarons
- 144g aged egg whites
- 72g caster sugar
Preparation:
- Aged egg whites – I used four medium size eggs and separated the egg whites by cracking the egg and cradling the egg yolk in my palm while letting the egg whites flow through my fingers into a bowl. I find this to be a fail safe method (unless you accidentally crack the egg too hard and break the yolks) instead of passing the egg yolks between the shells. Use cold eggs (apparently it’s easier to separate), and three bowls – one for the egg white, one for the egg yolk and one to store the separated whites. The latter is to prevent the separated whites from being ‘contaminated’ by the egg yolks in case you accidentally break one yolk while separating. Four medium sized eggs yields slightly more than 144g of egg whites. I poured the egg whites through a sieve into a bowl before covering the bowl loosely with clingfilm (I cut a few holes in the clingfilm) and placing it in the fridge. My egg whites were aged about 2 days (from Wednesday night till Sunday night) and I let the egg whites come back to room temperature before beating. It’s VERY important not to have a trace of fat in any of the utensils or dishes that you use for the egg whites else you’ll never be able to beat it till it turns stiff.
- Almond powder – Sift and sift again. You’ll be surprised how much almond powder is still left behind after sifting. I don’t have a food processor, so what I did was to sift a pack of almond powder (almost 400g) twice. It does take some time and you do have to press the powder through the sieve sometimes, but it looks like the only way to produce a finer powder. Sift first THEN measure out what you need.
- Icing sugar and cocoa powder – mix both together and pass it through the sieve as well.
- Measuring – it’s best to use a digital scale as I came across many posts that emphasizes the importance of accuracy when it comes to measuring out the ingredients for macarons. Attempt #2 was done with a normal weighing scale, this time around, I bought a RM49 digital scale from Aino @ Empire Shopping Centre.
Method:
1. Cut out your parchment paper to the size of the baking trays you are going to use. Trace the circles out on the parchment paper (Ikea used to sell plastic table mats that had circles printed upon it as a pattern, I bought two and use those as a template). Stack two baking trays onto each other – this will prevent the base of the macarons from cooking too fast.
2. Prepare a piping bag with a plain tip. I use plastic piping bags, and I place it in a tall glass with the top of the bag folded over the lip of the glass – this will make it easy to fill the bags.
3. Combine the sifted almond powder with the icing sugar and cocoa. Most recipes call for processing these ingredients in a food processor before sifting but just sifting worked out fine for me.
4. Place the egg whites in stainless steel bowl – apparently using stainless steel bowls helps with the beating and stabilizing of the egg whites.
5. I used my KitchenAid during attempt #2, but this time around, I decided to use my trusty hand beater. I find that I have a better ‘feel’ for the eggs and am less likely to overbeat it.
6. When the eggs have become frothy and the whisk starts leaving marks in the foam, add in half the caster sugar. Continue beating and adding in the rest of the sugar over the next minute.
7. Increase the speed of your beater and continue beating until the egg whites are stiff (ie. the peak stays up instead of dropping down). Be careful not to over beat – what I did was to stop every 30 seconds or so to check.
8. Fold in the dry ingredients in two batches. This is the part which is called ‘macaronage’. You basically slip your spatula to the bottom of the bowl, then bring it around and up again and ‘dump’ the ingredients on top of the mixture while pressing down slightly to deflate the mixture at the same time (this video shows the proper macaronage technique at 1:45 mins):
Once the ingredients are incorporated, continue folding until the consistency of the batter is ‘lava/magma-like’. This is the word that is most often used to describe the consistency of the macaron batter – basically, it flows off the spatula in ribbons but is still slightly thick whereby the ribbon of batter is not immediately absorbed back into the batter. The mixture will be slightly glossy as well. The best way to ensure you don’t overbeat is to stop after every few strokes to check.
9. Transfer the batter to the piping bag – I do this in two batches as it’s easier to pipe with a half full piping bag.
10. Pipe four tiny dots of batter under the corners of the parchment paper to ensure it doesn’t move while piping.
11. Pipe your macarons based on the template that you’ve drawn previously. Pipe it slightly smaller than the circle that you have drawn as the batter will spread slightly. My way of piping – I place the opening of the piping bag in the middle of the circle and press out the batter without moving the tip. The batter will spread and when it’s close to the edges of the circle, I stop and pull the piping bag upwards quickly. This leaves a small peak which will settle during the resting period.
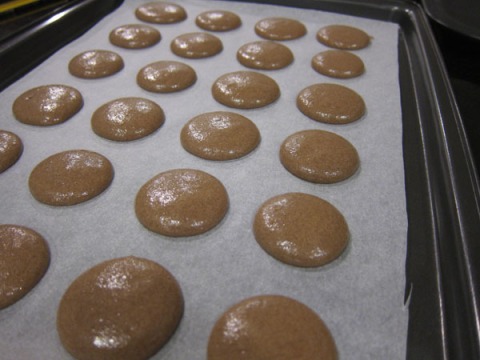
12. Once done, rap the tray about 2 times on a hard surface, turn it 90 degrees and rap again. Continue till you’ve turned the tray four times. Rapping the tray will bring up any air bubbles in the batter.
13. Let the batter rest while you preheat the oven. My kitchen has a ceiling fan and I usually bake at night when it’s cooler and not so humid, and after 30 minutes of resting, a skin did form on the macaron batter – ie. the batter no longer sticks to my finger when I touch it gently.
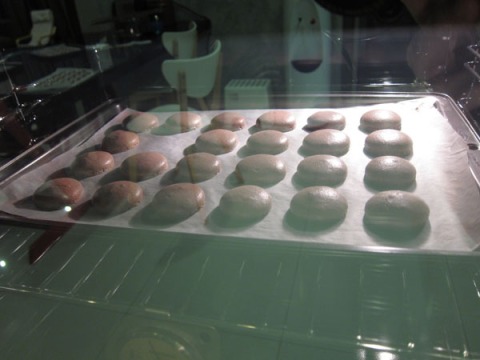
14. Place in the middle rack of the oven and bake. Some recipes require you to turn the tray halfway through, but I left it in the oven throughout the baking time. The feet started forming about 7 minutes into the baking time. These are my observations based on the different resting times (since I could only bake one tray at a time) and temperature (do note that this will differ depending on your oven as well, so it’s alot of trial and error unfortunately):
- Tray 1 – Rest for 30 minutes, 150 degrees Celsius, 16 mins: some cracked shells (only those at the sides of the tray), some shells were hollow, the bottoms were quite sticky
- Tray 2 – Rest for 50 minutes, 145 degrees Celsius, 16 mins: less cracked shells than above, less hollow shells too, shells in the middle of the tray had sticky bottoms, the rest around the sides were ok.
- Tray 3 – Rest for 70 minutes, 145 degrees Celsius, 17 mins: almost no cracked shells, less hollow shells too, shells in the middle of the tray had sticky bottoms, the rest around the sides were ok.
- Tray 4 – Rest for 90 minutes, 145 degrees Celsius, 18 mins: almost no cracked shells, less hollow shells too, shells in the middle of the tray had sticky bottoms, the rest around the sides were ok.
My conclusion from the above is that I need to rest the batter for at least one hour and bake it at 145 degrees Celsius for at least 18 mins. My oven probably has hot/cool spots – I’m guessing the fan causes the middle of the oven to be slightly cooler, hence the stickier shells in the middle of the tray.
15. Test if the macarons are done when the cooking time is almost up – I tested mine at about two minutes before the allocated time as I didn’t want them to overcook, and then again after 1 min. When you can peel the shell off the parchment without leaving the base/feet behind, it’s time to take it out of the oven!
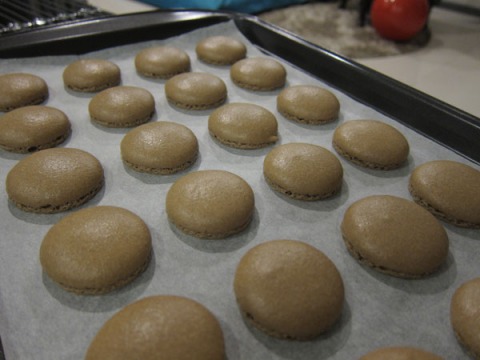
16. Once done, remove from oven and let the tray sit for a few minutes on a cooling rack.
17. Slide the parchment paper away from the tray and onto a cooling rack and let the macaron shells continue cooling down while you place the next tray into the oven.
18. Gently peel the parchment paper away from the shells. Yes, you read correctly. I found it easier to lift the parchment paper at an angle and slowly peel it off from the shell than the other way around. Try to pair up the shells as you peel them off, it’ll save time when filling and assembling the macarons later.
19. Leave the cooled shells on a baking tray feet side up (I found that if you put it feet side down, it’ll stick slightly to the tray) if you are assembling it on the same day, else store in an airtight container.
20. You may find the shells to be abit too crispy, don’t worry about that as the process of filling the shells and keeping it for 24 hours before eating will allow the flavor of the filling and the shell to marry – trust me, my macarons tasted much better after one day, it had the crispy-gooey texture that was missing when I first made it.
21. Once you’ve made your filling (chocolate ganache and salted caramel in this case, recipes below), pipe it onto the shells and place another macaron on top. ‘Twist’ it slightly while pressing down gently to pair up the macaron shells.
22. Voilà! You’re done!
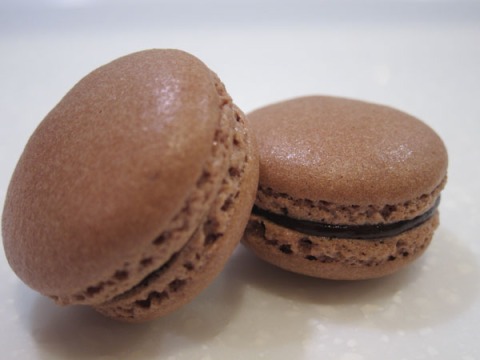
Chocolate Ganache recipe
This is a simple recipe I often use from a book by Gordon Ramsay. All you need is an equal amount of dark chocolate and heavy cream (35% fat). In this case, I used 100gm of each, it was more than enough to fill 20 shells. Chop the chocolate into small pieces. Bring the cream to boil. Pour it onto the chocolate and leave it to sit for about 1-2 minutes. Use a spatula and slowly stir the mixture in one direction till it’s smooth. I placed it in the fridge for a while for the ganache to harden slightly before piping. Some recipes call for butter, but since the ganache will be sandwiched in between the macaron shells, I didn’t bother adding butter to make it glossy.
Salted Caramel recipe
I used the recipe by BrownEyedBaker and it came out perfect on my first try. I didn’t want to risk burning the sugar, so I used an instant thermometer, but you can do without it if you’re familiar with working with sugar. This recipe produces about 2 cups of salted caramel, more than enough to fill the macarons. My only problem with the salted caramel is that it becomes rather soft at room temperature and unless you’re quick, the filling starts leaking out of the macaron shells. One blog recommends whisking the caramel till it reaches a buttercream consistency; perhaps I’ll try that next time.
I found that my macaron shells came out slightly on the pale side as I didn’t add any coloring since I wanted to ensure that I get the base recipe right this time around. I’ll definitely be experimenting with different flavors after this tho! Drop leave me a comment if you have any questions – I’ll try my best to help!
They are BEAUTIFUL! Well done!!!
Thank you! Much thanks to you and BraveTart! =)
[…] my usual pedantic self, I’ve decided to document my earlier two attempts before I finally succeeded in making French […]
[…] #3 (success!): click here Share:Like this:Like3 bloggers like […]